Tubeless Tire Losing Air Overnight? 6 Causes and Fixes
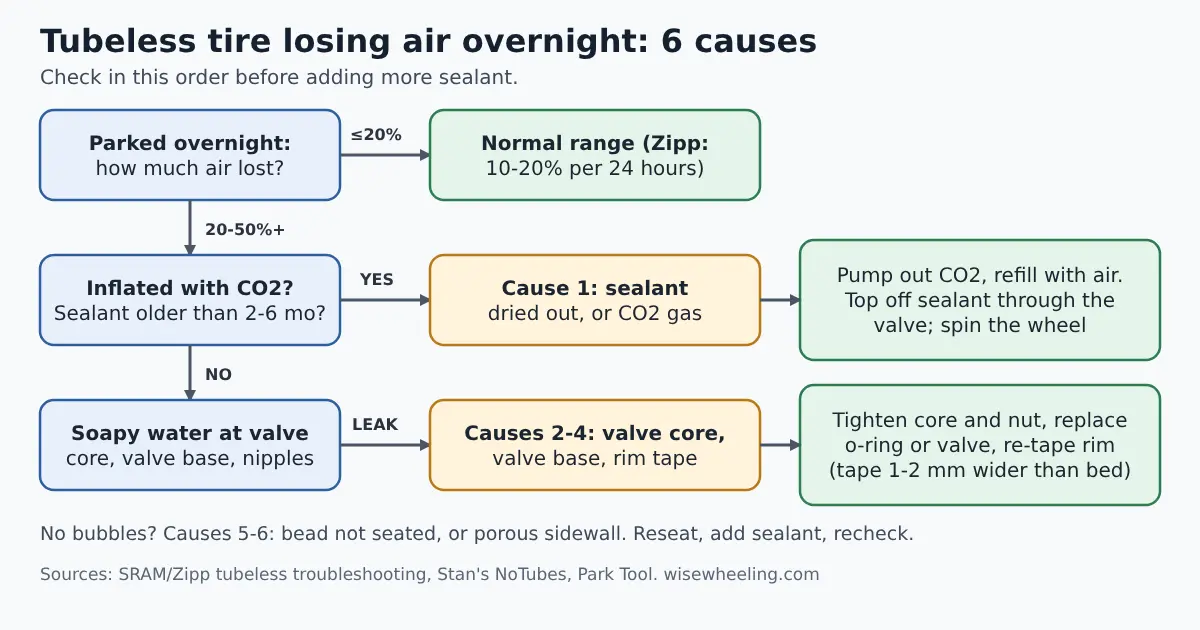
A tubeless tire that goes soft overnight with no puncture is leaking at one of six places: dried-out sealant, the valve core, the valve base, the rim tape, the bead, or a porous sidewall. Some loss is normal. SRAM’s Zipp guide puts normal at 10-20% of pressure over 24 hours, and says a drop of 50% or more in a day or two means a leak (Zipp tubeless troubleshooting).
Measure your loss first with the calculator, then work through the causes in order. Check before you pour in more sealant, because sealant will not fix a loose valve or failed tape.
Overnight air loss calculator
Overnight air loss calculator
Use the same gauge for both readings, so a difference between gauges does not skew the result. The 20% line is Zipp’s upper normal figure for 24 hours. Silca is stricter and says up to about 10% may be normal (Silca).
The 6 causes, the test and the fix
| Cause | Test | Fix | Source |
|---|---|---|---|
| 1. Sealant dried out, pooled or CO2 gas | Look inside for dried or pooled sealant. Ask if the tire was inflated from a CO2 cartridge. | Release CO2 and refill with air. Top off sealant through the valve core. Spin the wheel. | Zipp, Stan’s |
| 2. Valve core | Inflate to riding pressure, spray soapy water on the core. Steady bubbles mean a faulty or clogged core. | Tighten, clean or replace the core. | Silca |
| 3. Valve base | Soapy water where the valve meets the rim. Bubbles mean a poor seal. | Tighten the valve nut finger-tight. Replace a cut o-ring or damaged valve. | Zipp, Silca |
| 4. Rim tape and spoke holes | Soapy water around the spoke nipples. Sealant seeping at the nipples means tape failure. | Remove the tire, clean the rim, and re-tape. | Zipp, Stan’s |
| 5. Bead not seated | Bead sits low or looks uneven on one side. | Deflate, break the bead at the low point, lubricate with soapy water, reinflate. | Park Tool |
| 6. Porous sidewall | Fine sealant weeping on the casing, often on a new supple tire. | Add sealant and recheck after a few rides. | Stan’s, Silca |
Step by step: check in this order
1. Rule out CO2 and old sealant
CO2 dissolves in rubber about five times faster than oxygen, so a tire filled from a cartridge loses pressure quickly. Zipp’s advice is to release most of the gas and refill with air from a pump (Zipp).
Then think about sealant age. Stan’s says standard sealant should be topped off every 2-7 months depending on climate, and that its race formula needs a check every 2-3 weeks (Stan’s tubeless guide). Its support page recommends checking or refreshing quarterly (Stan’s sealant support). Zipp adds that sealant dries and pools if the bike sits, so spin the wheels once or twice a week and store the bike with the valve at the top (Zipp). If you replace sealant, see our tubeless sealant guide.
2. Soapy-water the valve
Inflate to riding pressure and spray soapy water on the valve core and the base where the valve meets the rim. Zipp says the lock nut should be finger-tight and not spinning freely, and warns that overtightening with tools can damage the rim (Zipp). If the valve is tight but still leaks, check the seat under the nut and the o-ring at the base. A valve with a bent or damaged Presta tip should be replaced. New to these valves? Read what a Presta valve is, or how to pump one with a regular pump.
3. Soapy-water the spoke holes
Spray soapy water around the nipples inside the rim. Bubbles, a hiss, or sealant buildup around the nipples all mean failed tape (Zipp). To fix it, remove the tire and look for tears or lifting adhesive. Stan’s says to clean the rim bed with isopropyl alcohol, then fit tape 1-2 mm wider than the rim bed, kept taut (Stan’s). Park Tool says to start the tape at least one spoke hole away from the valve and overlap the valve hole at the end (Park Tool, tubeless conversion). Zipp notes tire levers are the biggest cause of tape damage, so mount the tire by hand where you can.
4. Reseat the bead
Park Tool says the bead sometimes sits too low. Deflate the tire, break the bead at the low point, lubricate with soapy water, and reinflate (Park Tool). Stan’s advises a high-volume floor pump or compressor and never exceeding the maximum pressure on the rim or tire. Removing the valve core during seating allows more airflow (Stan’s). Hookless rims need hookless-approved tires (Zipp). A good floor pump makes seating easier.
5. Give a new tire time
Sealant takes time to plug the casing and bead. Park Tool says it can take hours and sometimes days. Every few hours, keep the pressure up and spin the wheel so sealant spreads to the bead (Park Tool). Stan’s says sealant weeping from the sidewall is normal evaporation, and that more porous tires may need a sealant refresh soon after setup (Stan’s).

Suryashankar Dasgupta founded Wise Wheeling. He has been cycling for more than 20 years, on geared and single-speed bikes, across many kinds of terrain. His guides cover bike repair, fit and gear, and each one is checked against manufacturer manuals, Park Tool and other primary sources before it’s published. Read how guides are made: https://wisewheeling.com/editorial-policy/