How to Remove Bike Pedals (Which Way to Turn + Torque Chart)
This post contains Amazon affiliate links. As an Amazon Associate I earn from qualifying purchases, at no extra cost to you.
To remove bike pedals, put a 15 mm pedal wrench on the spindle flats (or an 8 mm or 6 mm hex key in the back of the spindle) and, with the tool pointing up, push its top toward the back of the bike. The right pedal, on the chain side, unscrews counterclockwise. The left pedal is reverse-threaded and unscrews clockwise, so turning it the usual way only tightens it.
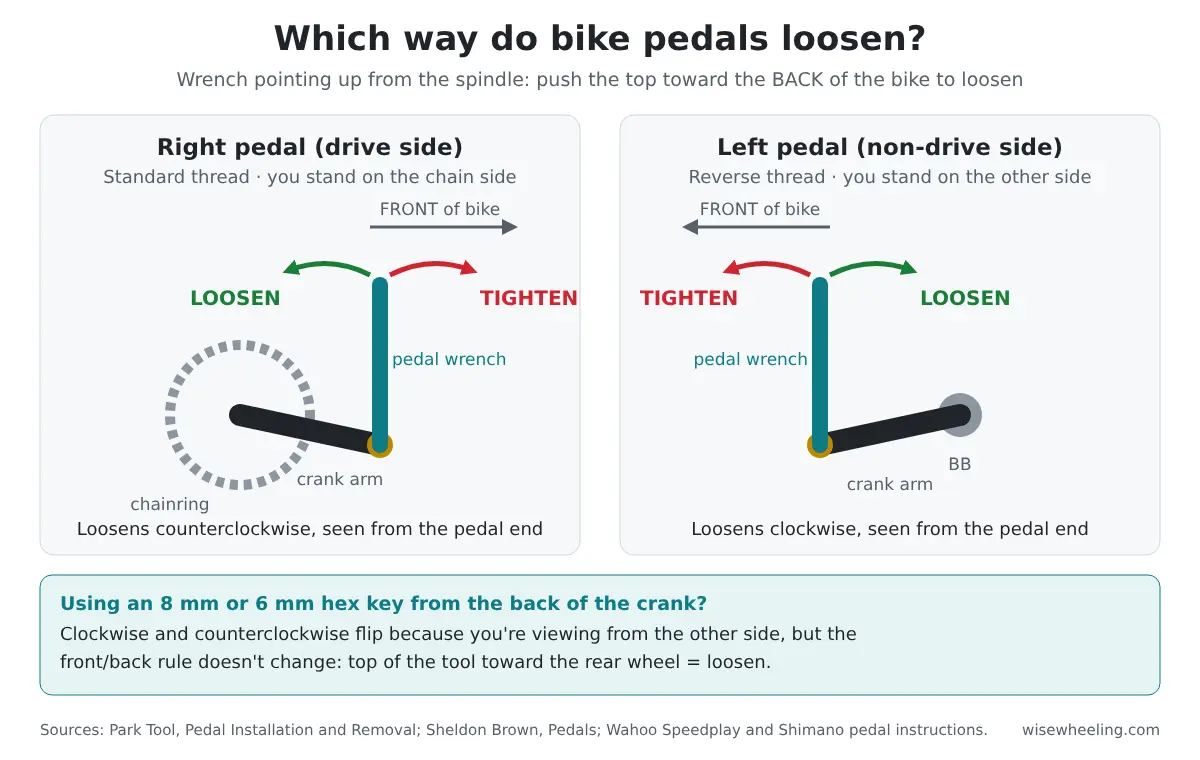
Clockwise and counterclockwise trip people up because they depend on where you’re looking from. Use the front/back rule instead. Point the tool up from the spindle, then push the top of the tool toward the rear wheel to loosen, or toward the front wheel to tighten. It works on both sides and with either tool. The helper below gives you the exact direction from where you’re standing, plus the install torque for your pedal.
Pedal direction and torque helper
How it works: right pedals use a standard right-hand thread and left pedals a left-hand thread (Park Tool). A hex key goes in from the back of the crank, so the clock direction you see flips. Torque values come from the manufacturer documents in the table below.
How to remove bike pedals in 3 steps
- Set up the bike and find your tool fitting. Put the bike in a stand or lean it against a wall with the chain side facing you. Shift onto the big chainring so the teeth are covered by the chain if your hand slips; Park Tool recommends this to avoid cuts. Look at the pedal: flats on the spindle between the crank and the pedal body take a 15 mm pedal wrench. A hex socket in the spindle end, on the back of the crank arm, takes an 8 mm (sometimes 6 mm) hex key.
- Get your leverage right, then break it loose. Position the wrench so it makes an angle of 90° or less with the crank arm, which is Park Tool’s advice. Hold the opposite crank so the cranks can’t freewheel backward. Then push the top of the tool toward the rear of the bike until the pedal breaks free.
- Spin it out and repeat on the other side. Once it’s loose, unthread it by hand or with the wrench. Park Tool also suggests turning the crank forward with the wrench held still to help it along. Walk around the bike and do the left pedal the same way: top of the tool toward the rear wheel. On that side, that’s clockwise.
Done right, the whole job takes a few minutes. If either pedal won’t move after a firm push, skip down to the stuck-pedal steps before you reach for a longer pipe.
Pedal install torque specs by brand
You don’t need a torque spec to take pedals off, but you need one to put them back on. Most top-ranking guides skip it or quote a single “about 35 N·m” figure. The makers actually publish different numbers, from 30 N·m for Speedplay up to a 55 N·m ceiling for Shimano. These come straight from each brand’s own instructions:
| Pedal | Install torque (manufacturer) | US units | Tool named in the instructions |
|---|---|---|---|
| Shimano SPD (PD-M985, PD-M980, PD-M785, PD-M780) | 35–55 N·m | 305–479 in-lb (Shimano’s figure) | 8 mm Allen key |
| Crankbrothers Stamp 1 Gen 2 (2023+) | 34 N·m | ≈ 301 in-lb / 25 ft-lb | 8 mm hex wrench |
| Wahoo Speedplay | 30 N·m | ≈ 266 in-lb / 22 ft-lb | 8 mm Allen; titanium spindles 6 mm |
| Garmin Rally RS / RK / XC | 34 N·m | 25 ft-lb (Garmin’s figure) | Torque wrench or pedal wrench |
| Garmin Rally 110 / 210 | 35 N·m | 26 ft-lb (Garmin’s figure) | Torque wrench (needed for accurate power data) |
| No spec given (general guideline) | ≈ 40 N·m | about 360 in-lb, or 30 lb of effort on a 1-foot wrench | Pedal wrench |
Two notes on that table. Garmin also warns that a spindle left under-tightened could let the pedal fall off mid-ride, so treat these as real minimums, not suggestions. Brands we couldn’t confirm from an official document (LOOK, Time and others) are left out on purpose. Check the sheet that came in your pedal box, or the brand’s support site.
A torque wrench that covers 30–55 N·m is the easy way to hit these numbers. The Park Tool TW-6.2 ratcheting torque wrench (10–60 N·m) covers the full range. Many compact bike torque wrenches are built for small bolts, so check the range before you buy one for pedals. If you also do stem and handlebar bolts, you’ll want a small one too.
Which tool fits your pedal: 15 mm flats or a hex key?
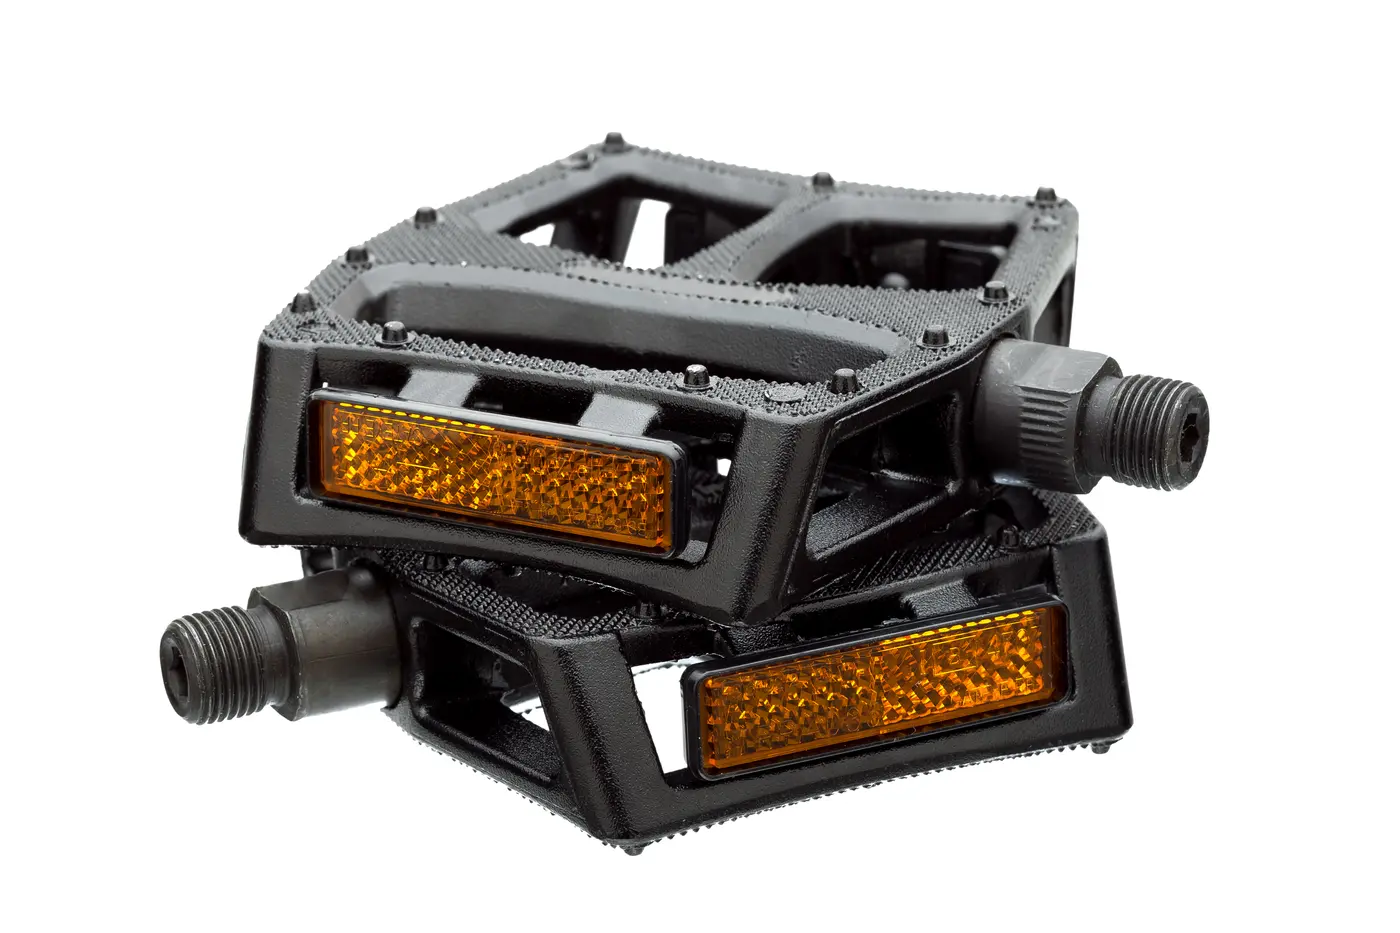
Sheldon Brown notes that most pedals have wrench flats on the axle, some have a hex fitting in the inner end of the axle, and some have both. Before you buy anything, check which one yours has and which thread it uses:
| What you see | Tool | Notes |
|---|---|---|
| Flats on the spindle between pedal body and crank | 15 mm pedal wrench | A standard 15 mm wrench works if it fits the flats. Park Tool says never use a thin cone wrench. |
| Hex socket in the spindle end (back of the crank) | 8 mm hex key (some 6 mm) | Shimano’s XTR/XT SPD, Crankbrothers and Speedplay instructions specify 8 mm. Speedplay titanium spindles take 6 mm. |
| Both flats and hex | Either | Break it loose with whichever gives better leverage on your crank |
| Pedal thread | Where you’ll find it |
|---|---|
| 9/16 in x 20 TPI | Most pedals |
| 1/2 in x 20 TPI | Pedals for one-piece steel cranks (one forged piece runs through the bottom bracket) |
| 14 mm x 1.25 mm | Older French bikes; rare |
For the wrench, a long, thick-jawed pedal wrench is worth having: the extra handle length is what breaks a tight pedal loose. The Park Tool PW-5 Home Mechanic pedal wrench is the common pick, and the longer Park Tool PW-4 Professional 15 mm pedal wrench gives more leverage. For hex-only pedals, a long-handled Park Tool HT-8 8 mm hex wrench beats a short Allen key from a multi-tool. Check the current price on Amazon.
What to do when a pedal won’t come off
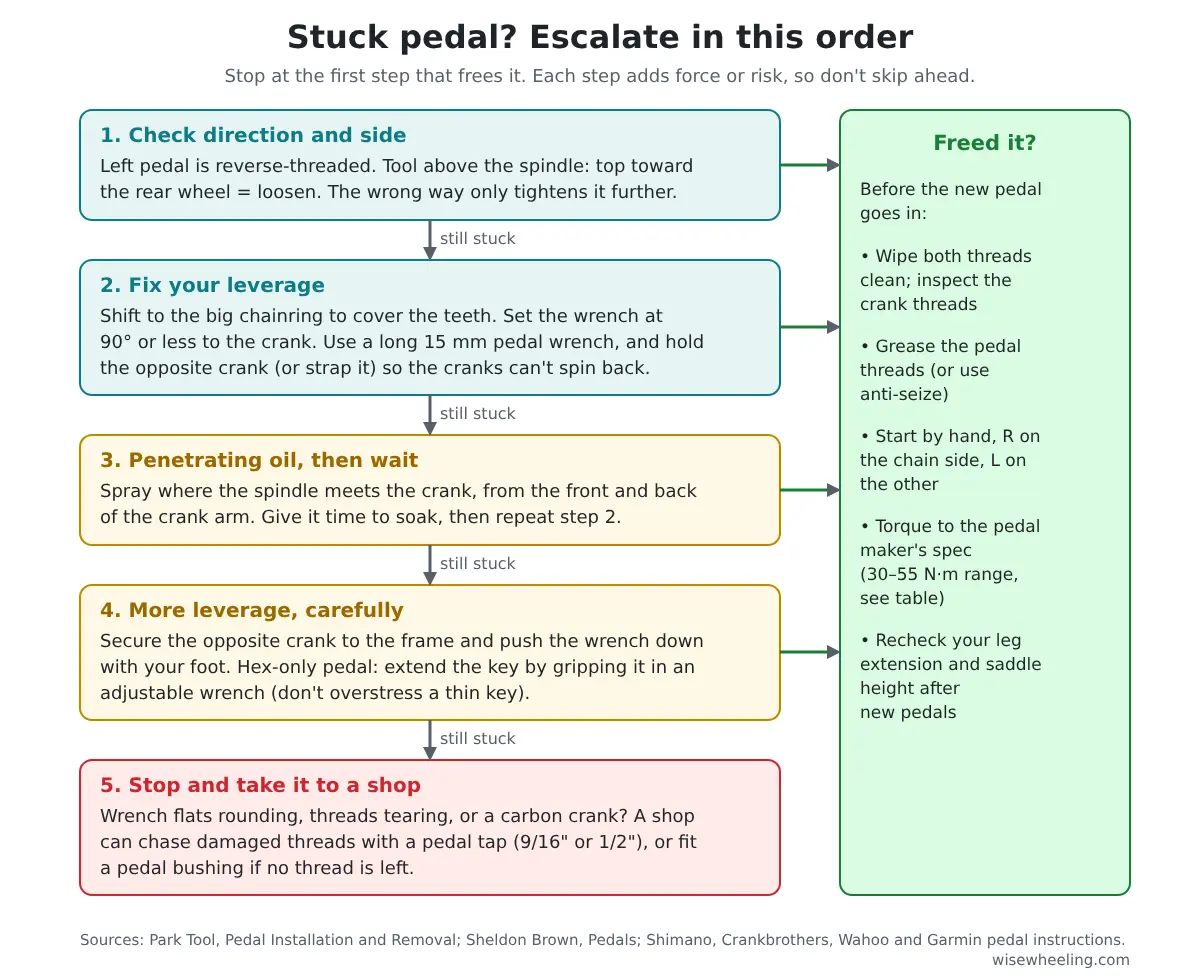
Pedals that were installed dry, or that have spent winters on a commuter, can be very tight. Work through this in order:
- Re-check direction and side. The left pedal is the one people get wrong. Tool pointing up, top toward the rear wheel. If you’ve been heaving the other way, you’ve only tightened it.
- Fix your leverage. Wrench at 90° or less to the crank, big chainring, a long 15 mm pedal wrench. Sheldon Brown’s trick is to tie the opposite crank with a toe strap so the cranks can’t turn. He also says pointing the wrench back toward the bottom bracket reduces stress on the strap.
- Penetrating oil, then patience. Spray where the spindle threads meet the crank, from both the front and back of the crank arm. Let it soak, then try step 2 again. A can of Liquid Wrench L106 penetrating oil is cheap insurance to keep on the shelf.
- More leverage, carefully. For a really stubborn pedal, Sheldon Brown suggests securing the opposite crank to the seat tube or down tube so you can push down on the wrench with your foot. With a hex-only pedal, you can lengthen the key by gripping it in the jaws of an adjustable wrench. Don’t overstress a thin key, though.
- Know when to stop. If the wrench flats are rounding, the hex socket is stripping, or you can feel the crank threads tearing, stop. Park Tool explains that a shop can chase damaged threads with a pedal tap (TAP-6 for 9/16 in, TAP-3 for 1/2 in). A tap realigns threads but can’t restore metal that’s gone. If no threads are left, a professional can install a pedal bushing kit.
Pulling the crank arm and holding it in a vise is another option for a pedal that won’t move. That’s a bigger job. See our guide to removing a bike crank without a puller if you go that route.
How to install the new pedals so they come off next time
- Match the pedal to the side. Look for the “R” and “L” stamped on the spindle or wrench flats. Park Tool says if there’s no stamp, use the slope of the threads. R goes on the chain side.
- Clean and grease both threads. Park Tool says to grease pedal threads heavily, with grease or anti-seize compound. Park Tool PPL-1 PolyLube 1000 is one of the two compounds Park’s guide names. We cover grease choices in should you grease bike pedal threads?
- Start by hand. Thread each pedal in with your fingers for several turns, turning the spindle in the direction of pedaling, which is how Sheldon Brown describes it. If it binds right away, back out and restart. Wahoo warns that cross-threading can damage the pedals or crank arms.
- Torque to spec. Use the table above, or about 360 in-lb if your pedal maker gives no figure.
- Re-check your fit. Crankbrothers tells riders to check leg extension after installing pedals and adjust saddle height if needed. A pedal with a different stack height can change it. Our saddle height guide walks through it.
What most pedal guides get wrong
- “Lefty loosey” doesn’t apply to the left pedal. It’s reverse-threaded, so it loosens clockwise when you look at it from the pedal end.
- Clockwise flips when you use a hex key. The key goes in from the back of the crank, so you’re viewing the spindle from the opposite end. Park Tool tells mechanics to picture the direction from the pedal’s side for this reason. The front/back rule sidesteps the whole problem.
- The reverse thread isn’t about bearing drag. Sheldon Brown explains that pedals unscrew themselves because of a phenomenon called precession, not bearing friction. That’s why the left pedal gets a left-hand thread.
- One torque number doesn’t fit every pedal. The published specs above range from 30 to 55 N·m.
Swapping pedal types while you’re at it? Our clipless vs flat pedals comparison covers which one suits your riding.
FAQ
Are both bike pedals reverse threaded?
No. Only the left (non-drive side) pedal has a left-hand, reverse thread. The right pedal has a normal right-hand thread. Both pedals tighten when turned in the direction you pedal and loosen toward the back of the bike.
Can I remove pedals with a regular wrench?
Yes, if a standard 15 mm wrench fits the flats. Park Tool warns never to use a cone wrench, which is too thin. A dedicated pedal wrench is longer, which makes tight pedals much easier. Hex-only pedals need an 8 mm (or 6 mm) hex key instead.
How tight should bike pedals be?
Use your pedal maker’s spec: 35–55 N·m for the Shimano SPD models listed above, 34 N·m for Crankbrothers Stamp and Garmin Rally RS/RK/XC, 35 N·m for Garmin Rally 110/210, and 30 N·m for Wahoo Speedplay. With no spec, Park Tool’s guideline is about 360 in-lb, roughly 30 lb of force on a foot-long wrench.
Do I need to grease pedal threads?
Yes. Park Tool recommends greasing pedal threads heavily, with grease or anti-seize, before installing.
Why is the left pedal reverse threaded?
So that pedaling can’t unscrew it. Sheldon Brown explains that pedals work loose because of precession, not bearing friction. Giving the left pedal a left-hand thread means that effect works to keep it tight.
Sources: Park Tool, Pedal Installation and Removal; Sheldon Brown, Pedals; Wahoo Speedplay quick start guide; Garmin Rally owner’s manual; Crankbrothers Stamp 1 Gen 2 owner’s manual; Shimano PD-M985/M785/M980/M780 service instructions.

Suryashankar Dasgupta founded Wise Wheeling. He has been cycling for more than 20 years, on geared and single-speed bikes, across many kinds of terrain. His guides cover bike repair, fit and gear, and each one is checked against manufacturer manuals, Park Tool and other primary sources before it’s published. Read how guides are made: https://wisewheeling.com/editorial-policy/