How Much Sag Should a Mountain Bike Fork Have? (+ Calculator)
This post contains Amazon affiliate links. As an Amazon Associate I earn from qualifying purchases, at no extra cost to you.
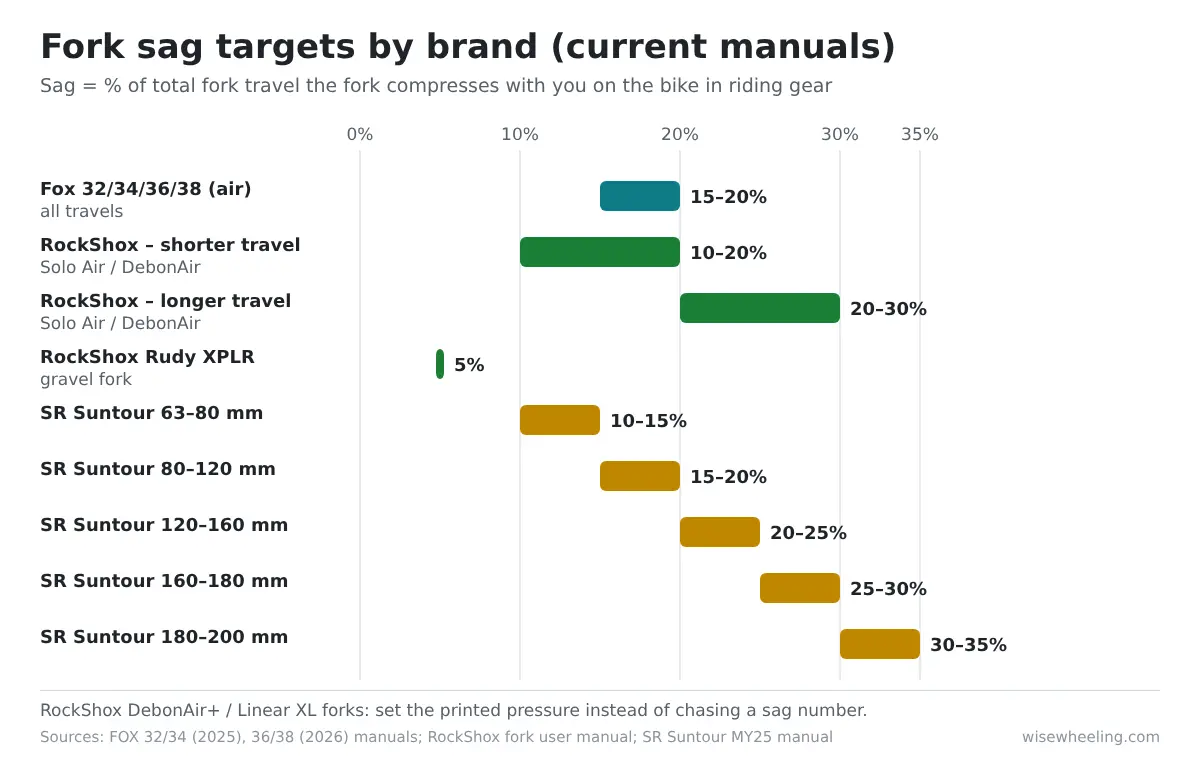
It depends on who made your fork, and that is why the internet can’t agree. Current Fox manuals say 15–20% of total travel for every air fork from the gravel 32 to the 38; RockShox says 10–20% for shorter-travel bikes and 20–30% for longer-travel bikes; SR Suntour scales its target with travel, from 10–15% on a 63–80 mm fork up to 30–35% on a 180–200 mm fork. On a 140 mm fork that’s 21–28 mm of sag on a Fox, and 28–35 mm on an SR Suntour. Pick your brand and travel in the calculator below to get your exact target in millimeters, then check what your measurement means.
Fork sag calculator: your target and what your reading means
Fork sag target by brand and travel
How the tool works: target sag in mm = travel × the brand’s percentage. Your sag % = measured mm ÷ travel × 100. A half-millimeter tolerance is allowed for ruler error. SR Suntour’s manual lists the boundary travels (80, 120, 160 and 180 mm) in two bands; the tool uses the lower band. RockShox doesn’t define “shorter” and “longer” travel, so choose the one that matches how your bike is built and ridden.
Fork sag by brand: what each manual actually says
| Fork | Sag target (% of travel) | On a 100 mm fork | On a 140 mm fork | On a 160 mm fork |
|---|---|---|---|---|
| Fox 32/34/36/38 air (current manuals) | 15–20% | 15–20 mm | 21–28 mm | 24–32 mm |
| RockShox, shorter-travel bike | 10–20% | 10–20 mm | 14–28 mm | 16–32 mm |
| RockShox, longer-travel bike | 20–30% | 20–30 mm | 28–42 mm | 32–48 mm |
| RockShox Rudy XPLR (gravel) | 5% | — | — | — |
| SR Suntour 63–80 mm | 10–15% | — | — | — |
| SR Suntour 80–120 mm | 15–20% | 15–20 mm | — | — |
| SR Suntour 120–160 mm | 20–25% | — | 28–35 mm | 32–40 mm |
| SR Suntour 160–180 mm | 25–30% | — | — | — |
| SR Suntour 180–200 mm | 30–35% | — | — | — |
Three things in that table trip people up. First, Fox used to print something different: its older tech-center guidance gave 25% of travel as the starting point for a fork or shock, a few points more for downhill and a few less for XC. A lot of guides still repeat that number, which is why you’ll read “25%” in one place and “15–20%” in another. Fox’s current fork manuals all say 15–20% and label 15% “firm” and 20% “plush.”
Second, RockShox frames sag as a trade-off rather than one number. More sag (20–30%) adds bump sensitivity and is “typically preferred on longer travel bicycles”; less sag (10–20%) is firmer and more efficient and suits shorter-travel bikes. Third, SR Suntour is the only one of the three that publishes a different band for every travel range, so a 180 mm SR Suntour fork wants roughly twice the percentage of a 100 mm one.
If your bike maker publishes its own sag number for your model, use it. Frame designers know their geometry better than a generic fork manual does.
Read this before you chase a sag number on a newer RockShox
Not every fork is set by sag. RockShox’s current user manual splits its forks in two: Coil, Solo Air, DebonAir and Dual Position Air forks are set by sag, but DebonAir+ and Linear XL air springs are set by pressure. The manual says setting those springs “does not require the ‘Set Sag’ procedure.” You pump to the recommended pressure (on the fork decal or in the RockShox Trailhead app), set rebound to the recommended clicks, and then fine-tune pressure on the trail. If you have a recent RockShox fork and you’re not sure which spring it has, look it up in RockShox Trailhead before you start measuring (RockShox user manual).
Gravel forks are the other exception. RockShox lists a 5% target for the Rudy XPLR, and Fox’s sag chart for its 32 Taper-Cast gravel fork works out to 6–8 mm on 40 mm of travel and 7.5–10 mm on 50 mm. Those are tiny numbers, so measure with calipers or a good steel ruler, not a tape measure.
How to measure fork sag (the 2-minute method)
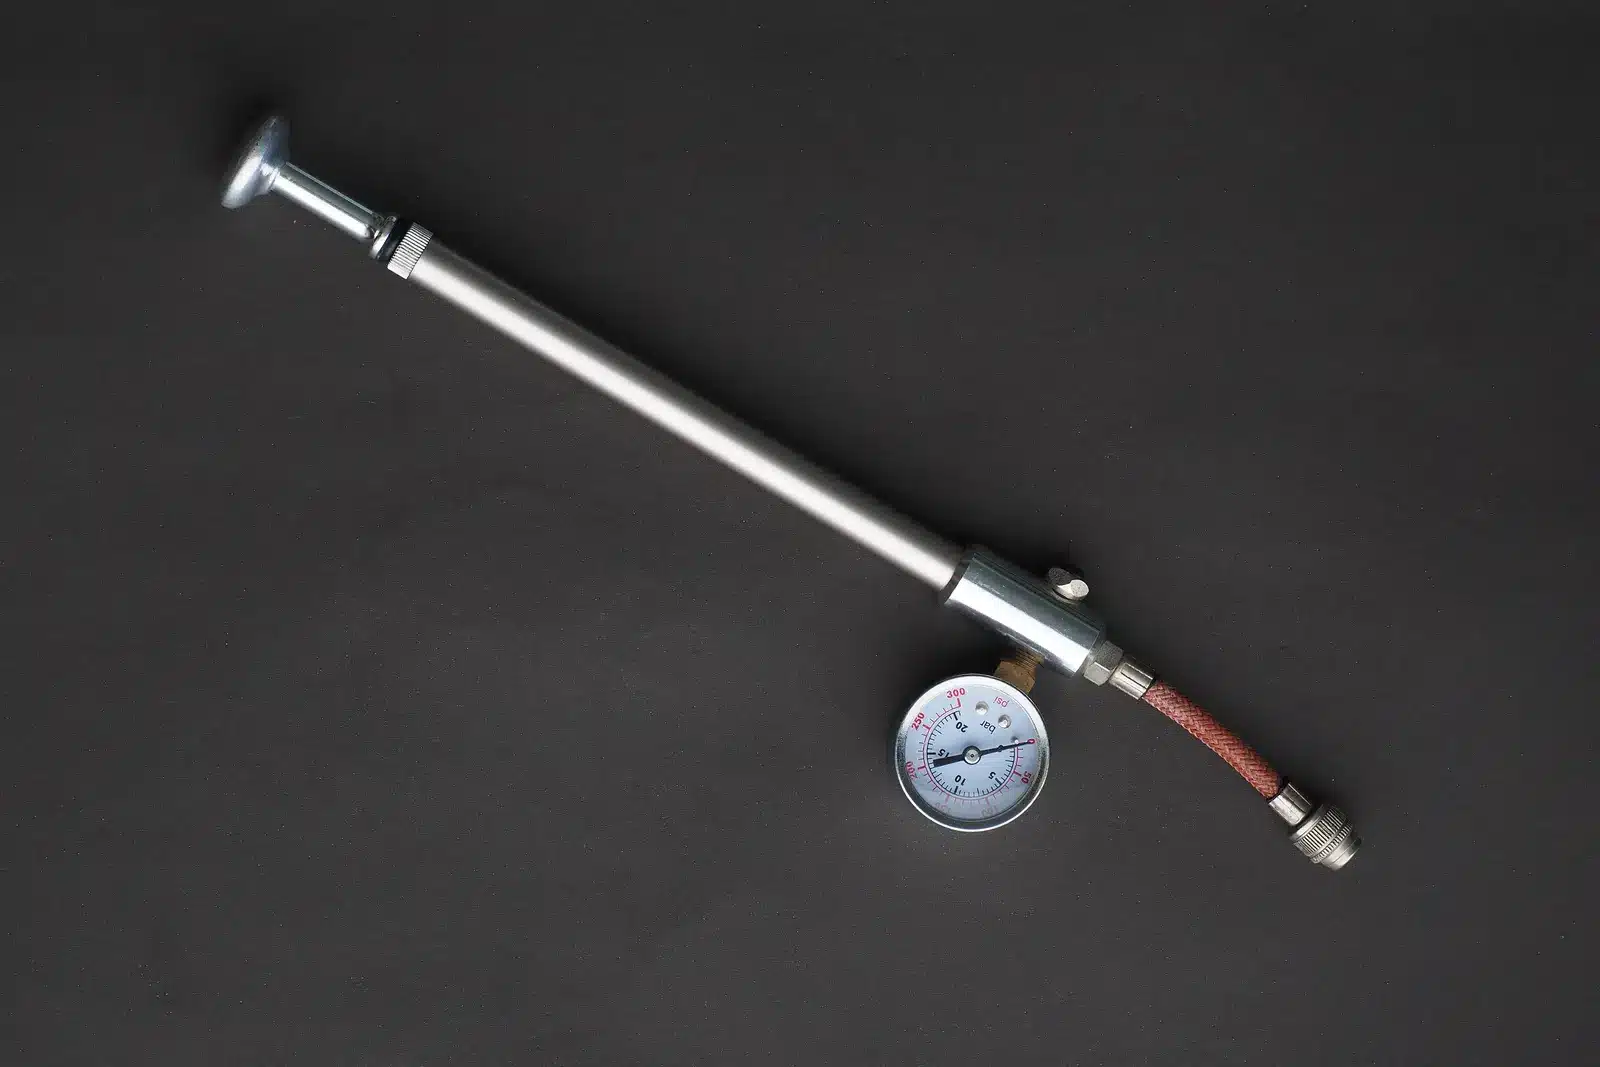
This combines the steps from the Fox and RockShox manuals. You need a high-pressure shock pump, a ruler or calipers, and something to lean on (a wall, a workbench or a friend).
- Open every damper. Flip the compression lever or remote to Open, and turn compression adjusters fully counterclockwise. RockShox also says to open rebound. Measuring with the fork locked or firm gives a falsely small reading.
- Pump to the starting pressure printed on the fork leg or in the chart below. Dual Position Air forks go in the full-travel position.
- Equalize (RockShox Solo Air and DebonAir). Compress the fork through at least half its travel five times, pump back to the same pressure, then do five more compressions. This balances the positive and negative air chambers so your reading is real.
- Gear up. Shoes, helmet, and a full hydration pack if you ride with one. Sag is measured at riding weight, not bathroom-scale weight.
- Settle into position. Lean against the wall, stand on the pedals and push the fork down about three times, then take your normal riding position with your weight spread across saddle, bars and pedals. Fox says hold it for at least 10 seconds.
- Set the o-ring. Slide the sag o-ring (or a zip tie) down against the dust wiper while you’re on the bike, or have a helper do it.
- Step off without bouncing and measure from the wiper to the o-ring. That’s your sag in mm. Many RockShox stanchions have printed percentage marks, so you can read it directly.
- Adjust and repeat. More air = less sag; less air = more sag. Re-equalize after every change on a Solo Air or DebonAir fork. When it’s in range, screw the air cap back on until snug and write the pressure down.
Need the pump? A Fox high-pressure shock pump or RockShox high-pressure shock pump both work on any Schrader-valve fork or air shock (check the current price on Amazon). A cheap set of 6-inch digital calipers makes the short gravel-fork readings far easier.
Fox fork starting pressure by rider weight
Fox prints a starting chart in every owner’s manual. These are the values for current models, side by side. They’re only starting points: Fox says you may land up to 10 psi above or below the chart once you set sag, depending on riding style, terrain and geometry.
| Rider weight (lb) | 32 Taper-Cast (gravel) (psi) | 34 FLOAT (psi) | 36 FLOAT (psi) | 36 FLOAT E-Bike+ (psi) | 38 FLOAT (psi) | 38 FLOAT E-Bike+ (psi) |
|---|---|---|---|---|---|---|
| 120–130 | 100 | 64 | 66 | 71 | 72 | 81 |
| 130–140 | 104 | 69 | 70 | 76 | 76 | 85 |
| 140–150 | 108 | 74 | 74 | 81 | 80 | 89 |
| 150–160 | 113 | 78 | 78 | 85 | 84 | 93 |
| 160–170 | 117 | 83 | 82 | 90 | 89 | 98 |
| 170–180 | 121 | 88 | 86 | 95 | 93 | 102 |
| 180–190 | 125 | 92 | 89 | 99 | 97 | 106 |
| 190–200 | 129 | 97 | 94 | 104 | 102 | 111 |
| 200–210 | 133 | 102 | 99 | 109 | 106 | 115 |
| 210–220 | 138 | 106 | 105 | 113 | 110 | 119 |
| 220–230 | 142 | 111 | 109 | 115 | 114 | 123 |
| 230–240 | 146 | 116 | 113 | 117 | 119 | 128 |
| 240–250 | 150 | 120 | 117 | 120 | 123 | 132 |
Two patterns jump out once the charts sit next to each other. The E-Bike+ versions of the 36 and 38 start roughly 3–10 psi higher than the standard forks for the same rider weight. And the 32 Taper-Cast gravel fork runs far higher pressure than any of the trail forks (100–150 psi), so don’t be alarmed by the number on your gravel bike’s pump gauge. For RockShox and SR Suntour, use the chart printed on your fork leg, in Trailhead, or in your SR Suntour manual for your exact model.
Sag is right but the fork still feels wrong
Sag only sets the spring rate for your weight. If the number is correct and the ride isn’t, the fix is usually somewhere else:
| What you notice | What it usually means | What to try |
|---|---|---|
| Sag is in range but you bottom out hard on drops | Spring is too linear for how you ride | Add a volume spacer; Fox lists this as the bottom-out fix, and RockShox calls its spacers Bottomless Tokens |
| Sag is in range but you never use full travel | Spring ramps up too much | Remove a volume spacer |
| Sag reading changes every time you measure | Air chambers not equalized, or you bounced getting off | Cycle the fork through half its travel 5 times, re-pump, measure without bouncing |
| Sag only comes out right far off the chart | Measurement error, or a non-standard setup | Recheck travel, o-ring position and that dampers are open; Fox allows up to ±10 psi from its chart |
| Coil fork: preload maxed and sag still too big (or too small with preload backed off) | Wrong spring rate for your weight | Fit a firmer or softer coil spring |
| Fork feels harsh even at the plush end of the range | Damping, not spring | Back off compression and set rebound to the recommended clicks before changing pressure |
If your lockout lever does nothing at all, that’s a damper problem, not a sag problem. Our guide to a fork lockout that isn’t working walks through it, and the same logic applies to a rear shock lockout.
Should a hardtail and a full-suspension bike run the same fork sag?
The fork manuals don’t change the target based on what’s at the back of the bike; they key off the fork and its travel. Rear shocks are a separate setting and usually run more sag than forks: RockShox, for example, recommends 25–30% for its coil rear shocks. So set the fork to its own manual, and the shock to the shock maker’s or frame maker’s number. If you’re still choosing between the two, our hardtail vs full suspension guide covers the trade-offs, and mountain bike geometry explained covers the frame numbers that decide how much travel a bike is built around.
Fork sag FAQ
Is 20% or 25% sag better on a fork?
On a current Fox fork, 20% is the plush end of the official 15–20% range, and 25% is outside it. On a RockShox fork on a longer-travel bike, 25% sits in the middle of the 20–30% range. On an SR Suntour, 25% is in range for 120–180 mm forks. Start inside your brand’s range, then adjust a few psi at a time on the trail.
Should I measure fork sag sitting or standing?
Fox says take your normal riding position with weight spread across the saddle, bars and pedals. RockShox says sit or stand in your normal riding position. Fox’s older guidance said standing attack position for downhill and freeride bikes and seated for XC, trail and all-mountain. Pick the position you actually ride in and use it every time so readings are comparable.
Do I need to check sag again later?
Recheck whenever your riding weight changes (a heavy winter pack, a loaded bikepacking setup), after a fork service, and if the fork starts feeling different. Air forks can lose a little pressure over time, and Fox notes its pressure figures are measured at 70–75°F, so expect lower readings in a cold garage.
Does an e-bike need more fork sag?
Not a different percentage, just more air to reach it. Fox gives separate E-Bike+ pressure charts for the 36 and 38 that start several psi higher than the standard forks, and the sag target stays 15–20%.
Can I set fork sag with a regular floor pump?
No. Fork air springs run high pressure in a tiny volume, and both Fox and RockShox specify a high-pressure shock pump with its own gauge. A floor pump head won’t give you the small, accurate steps you need.
Running wider or lower-pressure tires changes how a bike feels over roots too. If you’re tuning the whole bike, pair this with our tire pressure chart by weight.

Suryashankar Dasgupta founded Wise Wheeling. He has been cycling for more than 20 years, on geared and single-speed bikes, across many kinds of terrain. His guides cover bike repair, fit and gear, and each one is checked against manufacturer manuals, Park Tool and other primary sources before it’s published. Read how guides are made: https://wisewheeling.com/editorial-policy/