How to Remove a Bike Cassette (and Which Tool Your Bike Needs)
This post contains Amazon affiliate links. As an Amazon Associate I earn from qualifying purchases, at no extra cost to you.
To remove a bike cassette, take the rear wheel off, seat a cassette lockring tool in the lockring, and hold the cogs still with a chain whip. Then turn the tool counterclockwise until the lockring breaks loose with a loud crack, and slide the cogs off. Most of the frustration comes from the wrong tool: Shimano, SRAM and Campagnolo use different lockrings, and plenty of budget bikes don’t have a cassette at all. They have a thread-on freewheel that needs a different remover and no chain whip.
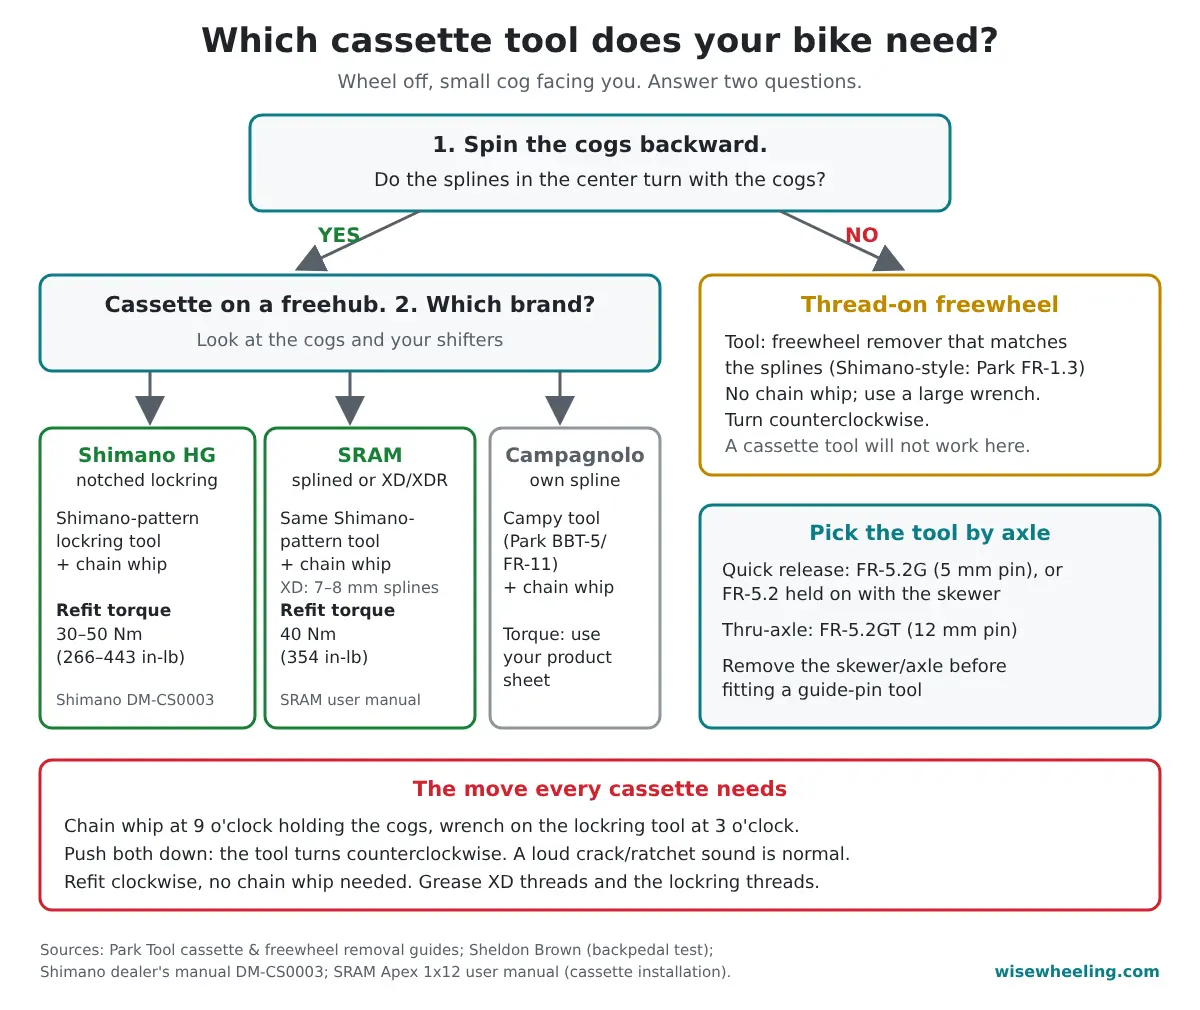
The selector below tells you which tools to grab and what torque to use when you put it back together. Under it you’ll find the 30-second test that tells a cassette from a freewheel, the full step-by-step, and fixes for a lockring that won’t budge.
Which cassette tool do I need? (Selector)
Cassette tool selector
How it works: the backpedal test is from Sheldon Brown, tool fitments from Park Tool’s cassette and freewheel guides, and the torque figures from Shimano dealer’s manual DM-CS0003 and SRAM’s user manual. All are linked in the sources at the end.
Cassette or freewheel? The 30-second test
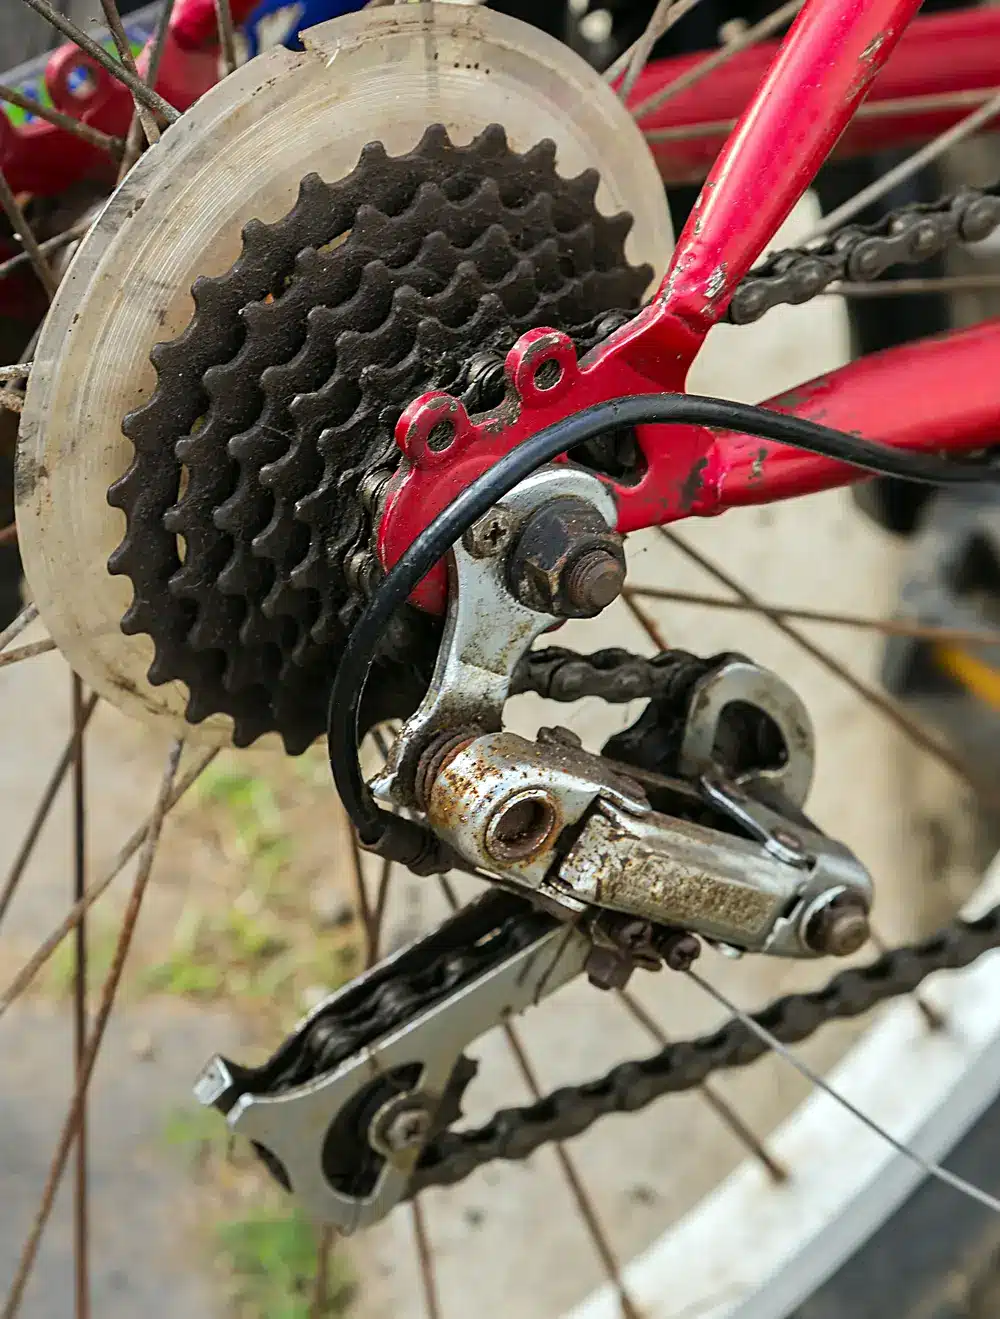
Pull the wheel, look at the center of the smallest cog, and spin the cogs backward by hand. Sheldon Brown’s test is simple: on a cassette the lockring splines turn with the sprockets; on a freewheel the extractor splines stay still. A lot of cassette hubs also have a bulge on the right end of the hub shell, though not all of them do.
This matters because the two tools look almost identical. Park Tool notes that freewheels show up on older bikes, lower-end bikes and many e-bikes, where the whole cog-and-ratchet unit threads straight onto the hub. Buy a cassette tool for one of those and it won’t engage.
Cassette tools and refit torque by system
Here is everything in one place. Most guides give one generic torque number and stop there. The figures below come from each maker’s own document, and where those documents disagree, we left the number out and told you where to look instead.
| System | How to recognize it | Removal tools | Refit torque |
|---|---|---|---|
| Shimano HG (e.g. CS-M8000, CS-HG500-10, CS-HG200-8) | Separate notched lockring; cogs slide onto a splined freehub | Shimano-pattern lockring tool (Shimano TL-LR15, Park FR-5.2 family) + chain whip | 30–50 Nm (266–443 in-lb) |
| SRAM cassette on a splined (HG-style) body | Separate lockring, same look as Shimano | Same Shimano-pattern tool (tool splines 4–8 mm long) + chain whip | 40 Nm (354 in-lb) |
| SRAM XD / XDR | Smallest cog 10T; whole cassette unscrews as one piece | Same Shimano-pattern tool, but splines must be 7–8 mm long; guide-pin tool + chain whip | 40 Nm (354 in-lb), threads greased |
| Campagnolo | Campagnolo shifting; different spline pattern | Campagnolo-pattern tool (Park BBT-5/FR-11) + chain whip | Use your cassette or wheel sheet (Campagnolo documents vary) |
| Cogs without a lockring (threaded first cog) | No notched lockring at all; smallest cog threads on | Two chain whips | Not stated by Park Tool |
| Thread-on freewheel | Center splines stay still when you backpedal | Freewheel remover matched to the splines (Shimano-style: Park FR-1.3); no chain whip | Not stated by Park Tool; seat by hand |
Two things stand out. First, Shimano and SRAM share one lockring tool, XD included, so a single Shimano-pattern tool covers most bikes in American garages. The catch with XD is spline length: SRAM wants 7–8 mm of engagement, and a short-splined tool can chew the lockring. Second, there’s no single “cassette torque.” Shimano gives a 30–50 Nm window for its HG cassettes and SRAM says 40 Nm. Park Tool uses “at least 40 Nm or whatever is recommended by the manufacturer,” and 40 Nm sits inside Shimano’s range too.
Tools you need
- Lockring tool for your axle. Thru-axle: Park Tool FR-5.2GT (12 mm guide pin). Quick release: Park Tool FR-5.2G (5 mm pin). The pin-less FR-5.2 works too if you hold it on with the skewer. Campagnolo: Park Tool BBT-5/FR-11.
- Chain whip, such as the Park Tool SR-12.2.
- Large adjustable wrench or a 1-inch socket and breaker bar.
- Torque wrench that reaches 40–50 Nm, for reinstalling: a 3/8-inch drive bicycle torque wrench.
- Grease for the lockring threads (and XD driver threads).
- Freewheel bikes only: a Park Tool FR-1.3 for Shimano-style freewheels, instead of the lockring tool and chain whip.
Check the current price on Amazon. As for cost: a lockring tool and a chain whip are a one-time buy that you’ll use every time you swap a cassette, clean a drivetrain properly or service a freehub.
How to remove a bike cassette, step by step
- Remove the rear wheel. Shift into the smallest cog first so the chain is slack and the wheel drops out easily. Open the quick release or unthread the thru-axle.
- Remove the skewer if your tool has a guide pin. Guide-pin tools (FR-5.2G, FR-5.2GT) need the skewer or axle out. With a pin-less tool, put the skewer back through the hub after you seat the tool and snug the nut against it, so the tool can’t cam out.
- Seat the lockring tool all the way. Park stresses that the tool’s teeth must be fully engaged before you turn it. A half-seated tool is how lockrings get rounded off.
- Wrap the chain whip around a cog. Shimano’s manual says to put the whip on a sprocket smaller than the middle one, because it isn’t stable on the larger cogs. Wrap it so it holds the cassette from turning counterclockwise.
- Position and push. With the cassette facing you, put the chain whip handle at about 9 o’clock and the wrench on the lockring tool at about 3 o’clock (Park Tool’s setup). Push both down at once. The tool turns counterclockwise, and you’ll hear a loud crack or ratcheting sound as the lockring’s locking teeth let go. That’s normal.
- Unthread the lockring and slide the cogs off. Lay the wheel flat so loose cogs don’t scatter. On XD/XDR, the whole cassette spins off as one unit instead.
- Note every spacer. Keep cogs and spacers in order and the same way round. Park Tool says to note where each spacer sits and reinstall it in the same orientation. If you’re fitting a different cassette, see our freehub body types guide for when the 1.85 mm spacer goes behind it.
How to install the cassette again
- Clean the freehub body and check it for gouges where the cogs bite in. BikeRadar suggests checking the freehub and hub bearings while the cassette is off.
- Line up the wide spline. Each cog and the freehub have one wide spline/groove. Shimano says the side with the group mark faces out.
- Grease the lockring threads (Park Tool) or, on XD/XDR, the driver threads. SRAM calls grease critical to stop an XD cassette seizing onto the driver.
- Thread it on by hand. The threads are fine and easy to cross-thread. If an XD cassette gets hard to turn after a few turns, SRAM says to back it off and start again.
- Torque it clockwise, no chain whip needed: Shimano HG 30–50 Nm (266–443 in-lb), SRAM 40 Nm (354 in-lb), or the figure on your cassette’s sheet.
- Check the shifting. Park Tool recommends rechecking the rear derailleur adjustment after fitting a new cassette or wheel. Our rear derailleur indexing guide walks you through it.
Replacing the cassette because it’s worn? The chain is usually worn too. See how often to replace a bike chain before you ride a new cassette on an old chain.
Cassette lockring won’t come off? Fixes in order
| What happens | Likely cause | Fix |
|---|---|---|
| Tool won’t fit at all | It’s a freewheel, or a Campagnolo cassette | Do the backpedal test; use a freewheel remover or a Campagnolo-pattern tool |
| Tool cams out or slips | Teeth not fully seated; no retainer | Seat it fully; use a guide-pin tool or clamp a pin-less tool with the skewer |
| Whole wheel just spins | Chain whip not holding, or wrapped the wrong way | Wrap the whip to resist counterclockwise rotation; put it on a smaller cog (Shimano) |
| Nothing moves under hand force | Normal: lockrings are tight and have locking teeth | 9-and-3 position, push both down; use a 1-inch socket with a breaker bar for leverage |
| Cogs wobble after refit | Missing spacer or wrong freehub length | Check the spacer; SRAM says contact a dealer if there’s lateral play after tightening |
| XD cassette tight after a few turns | Cross-threaded | Back it off and re-thread (SRAM) |
The breaker-bar tip comes from BikeRadar, which also explains why the chain whip is not optional: the lockring unwinds in the same direction the freehub freewheels, so without the whip the cassette just ratchets. Skip the hammer-and-screwdriver “no tools” tricks you’ll see online. They’re more likely to damage the lockring and the freehub than to save you anything.
When to take it to a shop
If the lockring is already rounded off, the cogs have dug deep into an aluminum freehub, or the cassette still wobbles after you’ve checked the spacers, let a shop look at the hub. Lost or swapped your thru-axle while the wheel was out? Match it with our thru-axle guide.
FAQ
Can you remove a cassette without a chain whip?
Not with normal tools. The lockring unscrews in the direction the freehub freewheels, so without something holding the cogs the cassette just spins. Freewheels are different: they come off with the remover and a wrench, no chain whip.
Which way does a cassette lockring unscrew?
Counterclockwise, looking at the cassette side of the wheel. It’s a normal right-hand thread. Freewheels also unscrew counterclockwise.
Do Shimano and SRAM use the same cassette tool?
Yes. Park Tool lists the same 12-spline tool (FR-5.2 family) for Shimano, SRAM, SunRace and others, and it also fits SRAM XD/XDR. For XD, SRAM wants tool splines 7–8 mm long. Campagnolo needs its own tool.
How tight should a cassette lockring be?
Shimano says 30–50 Nm (266–443 in-lb) for its HG cassettes, SRAM says 40 Nm (354 in-lb), and Park Tool says at least 40 Nm unless the maker specifies otherwise. Use the sheet that came with your cassette if it has one.
Sources
- Park Tool: Cassette Removal and Installation
- Park Tool: Freewheel Removal and Installation
- Shimano Dealer’s Manual DM-CS0003-07, Cassette Sprocket (PDF, retailer-hosted copy)
- SRAM Apex 1×12 User Manual: Cassette Installation (XD, XDR, splined)
- Sheldon Brown: Freewheels vs. Cassettes
- BikeRadar: How to replace your cassette

Suryashankar Dasgupta founded Wise Wheeling. He has been cycling for more than 20 years, on geared and single-speed bikes, across many kinds of terrain. His guides cover bike repair, fit and gear, and each one is checked against manufacturer manuals, Park Tool and other primary sources before it’s published. Read how guides are made: https://wisewheeling.com/editorial-policy/